
An introduction to Acrobat Pro
Adobe Acrobat Pro can be used to review and remediate PDFs that are untagged, poorly tagged, or have a questionable reading order. Tags provide the structure that assistive technology uses to understand and navigate PDF content. A PDF can look correct visually and still be inaccessible if its tags or reading order are missing or wrong. This resource focuses on using Acrobat Pro to review and repair PDFs that need accessibility remediation, including untagged, poorly tagged, scanned, or other PDFs whose tags, reading order, or document structure need correction.
What is an accessible PDF?
For a PDF to be accessible, it must be a tagged PDF. Tags identify the structure of the content, the purpose of non-text content, and the order in which content is read by assistive technology users. An accessible PDF also needs real, searchable text; meaningful alt text or other text alternatives for non-text content; and security settings that do not block assistive technology. Longer or more structured PDFs may also need navigation aids, such as bookmarks or a table of contents.
If your source document is a simple, accessible Word document and it is properly exported to PDF, it should contain appropriate tags. If the content of your document includes many graphics, tables, or a complex layout with wrapped images, such as a report, flyer, or infographic, you will need to review the PDF in Adobe Acrobat Pro to make sure the tags and reading order are correct.
Considerations before you start
Before remediating a PDF for accessibility, consider whether Acrobat Pro remediation is the best solution for your document. Review the following questions before you begin.
Can this document be archived?
Is your document a previous announcement, decision, or is it outdated in general? If you must keep a document for legal or reference reasons, but it is no longer relevant for everyday use, remove it from active Mass.gov content and archive it according to the appropriate retention process.
Documents that are outdated and not required to be kept available can be removed from Mass.gov and stored in the State Library archives if they are publications, or in the State Archives if they are internal or administrative documents.
Learn how to archive your old documents.
Can this be made into a web page instead?
This is often the most accessible and least time-consuming way to deal with an inaccessible PDF.
If your document is informational, could it be made into a page on your website (Mass.gov, your Content or Learning Management System) instead? If it is a form, could it be replaced with an accessible online form or service? This will often make the content easier to maintain and update over time. It can also make a form easier for someone to complete, especially on a mobile device, and an online form is generally easier to make accessible than a PDF form.
Does a source document exist?
An accessible PDF starts with a good source document. If you have a PDF that is not accessible, it is almost always easier to fix the source document than it is to remediate a PDF from a poor source. If you can obtain the source document, especially a Word document, you can often improve accessibility by making the source document accessible first.
Learn how to make an accessible Word document.
If the PDF was scanned from a paper document and does not have a source file, there is often a lot of work involved in remediating it. It may take less time to recreate the document as a page on Mass.gov, or as an accessible Word document and then export it to PDF, than it will to remediate it in Acrobat Pro.
You can attempt to recreate a source document by selecting File > Export To in Acrobat Pro and exporting the PDF to Word format. Then you can make any needed updates in Word and re-export the document to PDF. Depending on the quality of the original PDF, the results may vary. Treat the exported Word file as a draft source document. Review and repair its structure, headings, lists, tables, links, and alt text before exporting it back to PDF.
Is this the final version of the document?
Acrobat should be used primarily as a publishing and remediation tool rather than a document editing tool. If you go through the process of remediating a document for accessibility and then decide to make changes to the content, you will likely need to repeat some, and possibly most, of the remediation work.
Be sure that this is the final version of the document before you begin remediating the PDF. Complete any content edits in the source document first, then create or update the PDF and perform accessibility remediation as the final step before publishing.
Versioning files
It is possible that Acrobat will sometimes crash unexpectedly. To reduce the risk of losing work, use versioning.
Versioning means saving copies of your file as you complete major remediation steps so you can return to an earlier version if something goes wrong. Whenever you begin working on a document, make a copy first and work on the copy. Then, as you complete major steps in the remediation process, use File > Save As to save versions such as Document-v2.pdf or Document-v3.pdf.
Configuring Acrobat Pro
Configure the following settings so you can easily access the tools needed to remediate a PDF for accessibility.
Disable the New Acrobat Experience
This guide provides workflows in the classic Acrobat experience.
To switch to classic Acrobat:
- On Windows, select Menu > Disable new Acrobat.
- On macOS, select View > Disable new Acrobat.
- Restart Acrobat if prompted.
Add the Accessibility tool to the Tools pane
The right-hand Tools pane in Acrobat gives you access to tools for viewing, creating, editing, and remediating PDF documents.
To add the Accessibility tools to this pane:
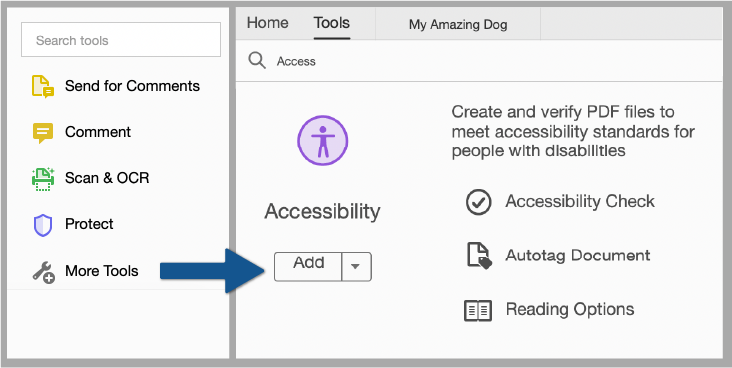
- Select the More Tools button at the bottom of the right-hand Tools pane.
- Search at the top for Accessibility, then select Add.
Triage the PDF before using repair tools
Before you start, review the PDF and decide what kind of file you have:
- Tagged
- Untagged
- Poorly tagged
- Scanned
- Image-only
A poorly tagged PDF has tags, but the tags are wrong, incomplete, or in the wrong order.
A quick way to check whether a PDF is tagged is to open the Accessibility tags panel (View > Show/Hide > Navigation Panes > Accessibility tags). If you see a tag tree with items such as <H1>, <H2>, <P>, <L>, or <Figure>, the PDF has tags. Tags still need to be checked. A PDF can have tags and still have accessibility problems. If the panel is empty or says there are no tags, the PDF is untagged. You can also run the Accessibility Checker. If the Tagged PDF check fails, Acrobat is indicating that the PDF does not contain the accessibility structure needed by assistive technology.
If you have the source file, check whether it was created in a way that preserves accessibility, such as with headings, lists, alt text, table structure, and a document title. A well-made Word document usually carries these features over when it is exported to PDF. If the source file is available, it is usually better to fix accessibility problems in the source file and create a new PDF. Then review the new PDF in Acrobat. Do not print to PDF. Printing to PDF usually removes tags and other accessibility information.
If the PDF was scanned from a paper document, is image-only, or does not have an accessible source document, expect more remediation work. In some cases, it may be faster to recreate the content as a page on Mass.gov or as an accessible Word document and then export it to PDF.
If a scanned or image-only PDF does not have searchable text, you can use Optical Character Recognition (OCR) to create text that can be selected and searched. Acrobat Pro includes a built-in OCR tool, but the results should always be reviewed for accuracy.
After OCR is complete, select and copy text from several pages of the document and paste it into a text editor or Word document. Review the pasted text for recognition errors, especially in headings, tables, lists, numbers, special characters, and areas where the scan quality is poor.
If Acrobat's OCR results contain significant errors, you may have better results using a different OCR tool or by recreating the document from a source file. Always verify OCR output before continuing with accessibility remediation.
What you can't fix in Acrobat Pro
Some accessibility issues are difficult or impractical to fix in Acrobat Pro and are usually better addressed in the source document. Before spending time remediating a PDF, review the source document for:
- Color contrast
- Using color only to convey meaning
- Images of text
- Complex tables
- Complex charts and graphs
- Non-standard or highly visual layouts
If the source document includes a complex chart or graph, it may need a text alternative, a data table, or a short summary so the information can be understood without relying on the graphic. Some font and character-encoding problems are also difficult to fix in Acrobat and may require a different font or a new PDF created from the source document.
Learn more about Data Visualization Accessibility.
If the source document can be fixed, it is usually better to make those changes and create a new PDF than to spend time remediating the PDF itself. If the source document is not available, you may still be able to remediate much of the PDF in Acrobat Pro, but it may require additional time and manual work.
Fonts, encoding, and text extraction
For a PDF to be accessible, its text must be readable and correctly extracted by assistive technology. If a PDF contains missing fonts, character-encoding problems, or text that does not extract correctly, screen readers and other accessibility tools may not read the content as intended.
These issues are often best fixed in the source document by using a different font and creating a new PDF. In some cases, Acrobat Pro may be able to resolve missing font issues by embedding fonts in the PDF using the Preflight tool. (opens in new tab)
If text cannot be extracted correctly after remediation attempts, consider recreating the PDF from the source document before continuing accessibility work.
Choosing a remediation workflow
At this point, you should have a good understanding of the type of PDF you are working with.
If your PDF is untagged, image-only, scanned, or has a severely damaged tag structure, start with the Make Accessible Action Wizard to create an initial tag structure before continuing remediation. The tags created by the wizard should always be reviewed and corrected as needed.
If your PDF was exported from an accessible source document, such as a properly structured Word document, start by using the Accessibility Checker. Review the tags, reading order, images, tables, links, and other content, and correct any issues that are found. Even PDFs created from accessible source documents should be reviewed before publishing.
The following practice resource is an untagged PDF and is intended for use with the Make Accessible Action Wizard.
Practice Resource
Practice PDF for remediation (untagged)
This resource is an untagged PDF that you can use to practice PDF remediation skills. Because the document is untagged, it follows the workflow for PDFs that need an initial tag structure. Begin by running the "Make Accessible" Action Wizard, then continue through the rest of the remediation steps. Practice PDF for Remediation (untagged)
The Make Accessible Action Wizard
The Make Accessible Action Wizard walks you through several initial accessibility tasks. It can set a document title, detect form fields, add alt text, set tab order, and automatically tag the document if it is not already tagged.
To run the Make Accessible Action Wizard:
- Select View > Tools > Action Wizard > Open. The Actions List panel opens.
- Select Make Accessible from the list. Under Files to be processed, your document should appear.
- Select Start.
- Add a Title and Author. Optionally, add Subject and Keywords if needed. Then select OK.
- Select the appropriate document language and choose Output: Editable Text and Images in the Recognize Text dialog box. This allows Acrobat to create searchable text from scanned content. Select OK. Important: This action can replace the existing tag structure in your document. If your PDF already contains good tags that you want to keep, skip this step by selecting the next item in the Make Accessible pane.
- If your document contains form fields, select Yes, Detect Form Fields from the prompt. If not, select No, Skip this Step. This resource does not cover PDF form remediation. If your PDF contains fillable form fields, use the PDF Forms Accessibility resource for additional guidance.
- Select the appropriate document language in the Set Reading Language dialog box. Select OK.
- Acrobat will attempt to detect figures in the document and identify items that may be missing alternate text. Select OK to continue.
- If prompted, enter alt text for each figure or mark decorative items as decorative.
- The Accessibility Checker Options dialog box opens. Uncheck Create accessibility report unless you want a detailed report, then select Start Checking. After the wizard finishes, review the Accessibility Checker results and continue with the remaining remediation steps in this training. The wizard creates an initial accessibility structure, but the document still requires manual review and remediation.
After the wizard finishes, review the Accessibility Checker results and continue with the remaining remediation steps in this training. The wizard creates an initial accessibility structure, but the document still requires manual review and remediation.
This concludes the Part 1 of making accessible PDFs in Acrobat Pro. Part 2 of this guide covers the following topics:
- The Accessibility Checker
- Reading order
- Graphics and alt text
- Working with tables
- The tags panel
- Document structure
- Language settings
- Document settings