
What is an accessible PDF form?
For a PDF form to be accessible, it must be a properly tagged PDF containing interactive form fields and associated tooltips. Tags in a PDF identify the structure of your content, the purpose of non-text content, and determine the order in which the content is read for a screen reader user. Form fields are added to the PDF after the document itself has been made accessible. Tooltips provide contextual information for each form field so that a screen reader user knows what information to provide in the field.
Learn how to create an accessible Word document for PDF export.
What is an accessible PDF?
For a PDF to be accessible, it must be a tagged PDF. Tags identify the structure of the content, the purpose of non-text content, and the order in which content is read by assistive technology users. An accessible PDF also needs real, searchable text; meaningful alt text or other text alternatives for non-text content; and security settings that do not block assistive technology. Longer or more structured PDFs may also need navigation aids, such as bookmarks or a table of contents.
If your source document is a simple, accessible Word document and it is properly exported to PDF, it should contain appropriate tags. If the content of your document includes many graphics, tables, or a complex layout with wrapped images, such as a report, flyer, or infographic, you will need to review the PDF in Adobe Acrobat Pro to make sure the tags and reading order are correct before continuing.
Considerations before you start
Before creating or remediating a PDF form, it is important to ask the following questions.
Can this be a web-based form?
Besides being more accessible, web-based forms can make data analysis and collection much easier and more streamlined since the form entries typically go automatically into a central database or spreadsheet. For PDF forms meant to be printed or submitted electronically, data often must be entered by hand into a central database or spreadsheet.
PDF forms also require a working understanding of PDF tags and structure to be made accessible, which can take hours of practice, trial, and error to master. Web-based forms such as Gravity Forms or Microsoft Forms do not require much technical knowledge and can be made accessible with a basic understanding of the fundamentals of digital accessibility.
Is a source document available?
If you have the Microsoft Word or Adobe InDesign source file that the form was created in, you will be able to adjust the accessibility of the source document before exporting to PDF. This will make the PDF remediation part of PDF form-building much easier and less time-consuming.
A quick note about formatting: Many older or legacy forms intended for printing were constructed with tables to define the form field areas. Tables that are used for formatting rather than tabular data can make an accessible experience nearly impossible without special tools, advanced PDF tagging skills, and a lot of time. Avoid tables for formatting, and if you already have a PDF form that was created with tables, use the source document to redesign the form without tables and re-export the PDF.
Is this the final version of the form?
As with all PDF documents, Acrobat Pro should not be used as a document editing tool, but as a publishing tool. If you go through the process of remediating a PDF for accessibility and then decide to change a few words in the document, it is likely you will have to perform all the remediation steps again. Be sure that this is the final version of the document that is ready for publishing before performing these steps.
Am I comfortable remediating a PDF in Acrobat Pro?
Creating accessible PDF forms is an advanced skill set that requires not only knowledge of how to create an accessible source file in a tool like Microsoft Word, but also how to remediate a PDF using Acrobat Pro. If you find you need assistance, there are several ways to find help:
- Review the following training resources which are prerequisites to creating an accessible PDF form. You will need to be comfortable with these concepts before being able to create an accessible PDF form.
- Accessibility fundamentals
- Word documents for PDF export
- PDF Accessibility with Acrobat Pro, part 1
- PDF Accessibility with Acrobat Pro, part 2
- Bring your question to ACCESS Office Hours.
- Find a remediation service through the Statewide IT Accessibility Services Contract, ITS82 to get your PDF form remediated by a vendor for a fee.
Start with an accessible source document
When creating a form from scratch or altering a previously created form, starting with a well-structured, accessible source file, like a Microsoft Word document, can make the form-building process easier.
Assistive technology like screen readers have a "forms mode" which automatically toggles on when the screen reader encounters form fields on a page. Using the tab key in forms mode skips over the visible text in the document and reads only the form field tooltips and any links. For this reason, any instructions for the form should be placed before any form fields in your document.
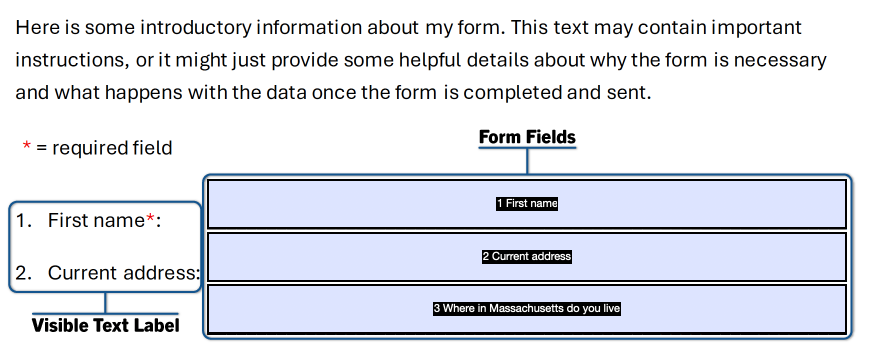
When designing your source document, include visible text labels and leave space for form fields. Avoid using tables for formatting or to indicate form fields. Including underlines for text fields, circles for radio buttons, or boxes for checkboxes will help Acrobat autodetect these fields, but you can also simply leave these out of your document. You will add all of these interactive elements to the final PDF.
Once your source document is complete and as accessible as you can make it, save it as a PDF. Before adding form fields, make sure you've followed the steps to make your PDF accessible and you've tagged the non-text elements (e.g., underlines, boxes, and circles) as Artifacts.
Add form fields
In the Tools tab of Acrobat Pro, search for Prepare Form, or scroll to find it listed under Forms & Signatures, and add it to your tools pane for easy access.
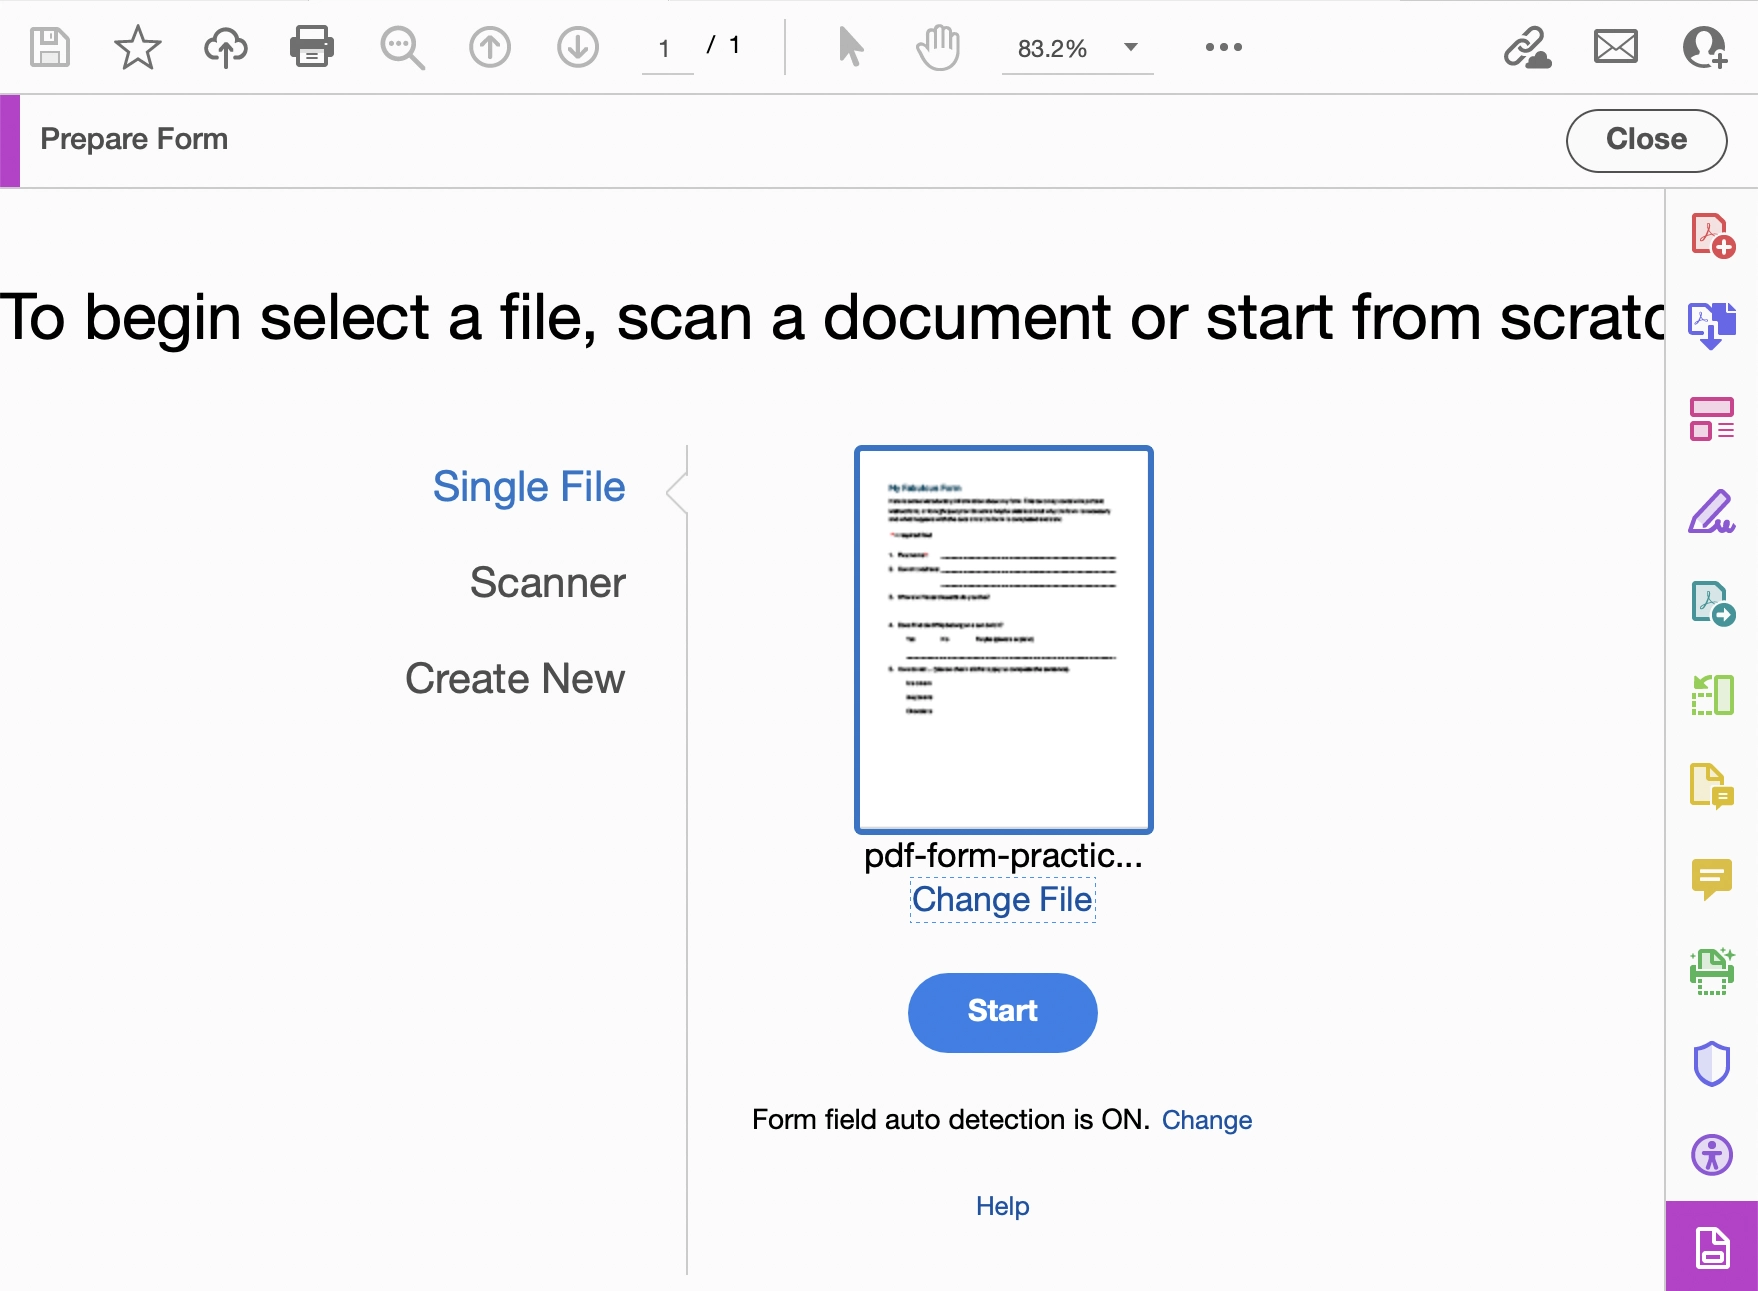
When you select the Prepare Form tool with your document open for the first time, Acrobat will start a dialog that attempts to scan your document and add form fields and tooltips automatically. This can be a great timesaver but also must be manually checked for accuracy. Most likely not all needed fields will be autodetected accurately, and it's good practice to check the properties of each form field before finalizing the form.
Select Start to have Acrobat begin to automatically detect form fields in your document. The document will open with suggested form fields added.
To add form fields manually, select a form field type in the Prepare Form tool bar above your document, and place the field on the page near its text label.
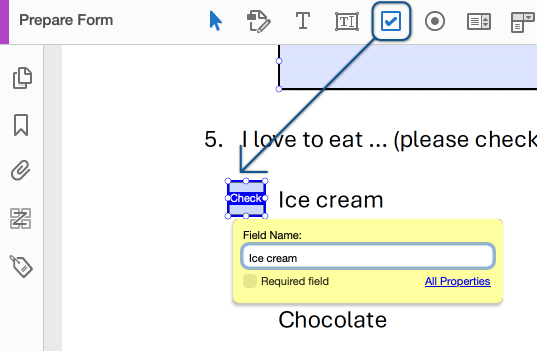
When you select the field type, your cursor will change. Place the field by clicking or clicking and dragging to resize the field in the desired location. Acrobat will prompt you to provide a name for the field in the Field Name box. This name is not conveyed to screen readers but can be helpful as you create your tooltips and tab order for the form fields.
If the field is required, check the Required field box when you add a field name or:
- Right-click the field.
- Select Properties.
- Open the General tab.
- Under Common Properties, check the Required field box.
Remember to also include the word "required" in the tooltip for any required fields.
Text fields
Text fields offer several customization options available on the different tabs of the Text Field Properties dialog, but the only required information for text fields is the Name and Tooltip value:
- Appearance
- If you choose to customize the font, color, and size of the text users enter, be sure the font is sans serif, clear, and legible, the font size is no smaller than 12pts, and the text color meets contrast requirements with both the fill color of the form field and the background of the form.
- Options
- You can choose to check spelling, allow multiple lines of text in the field, scroll long text, allow Rich Text Formatting (e.g., bold, lists, italics), and set a character limit for the field. If you set a character limit for the field, add this information to the form field tooltip.
- Format
- You can automatically format your text field to be a percentage, a date, a time, or something else you define. Remember that if you choose a format for your text field, users will not be able to add any additional information to the field other than what was defined.
Check boxes
After adding a check box to your form, you can modify it by right-clicking it, and selecting Properties.
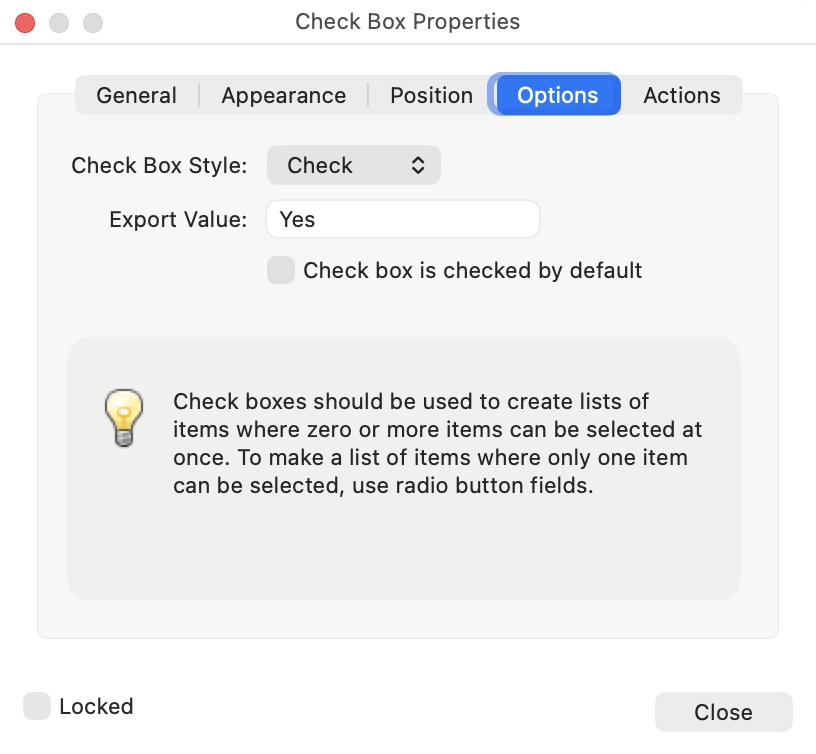
In the Options tab of the Check Box Properties dialog, you can select the Check Box Style and define its Export Value. For example, the default is for check boxes to appear as checks when selected and the Export Value defined as "Yes."
Radio buttons
Radio buttons should only be used for items that require a single selection. Unless you include a link or button on your form to reset it, once a user makes a radio button selection, there is no way to clear that selection. In general, radio buttons should only be used for items that are required on your form or should include an option for "not applicable" or "none" if not required.
Radio buttons are grouped, which means that there needs to be at least two or more choices for that item. Radio buttons require the Name and Tooltip to be the same for each radio button in the group.
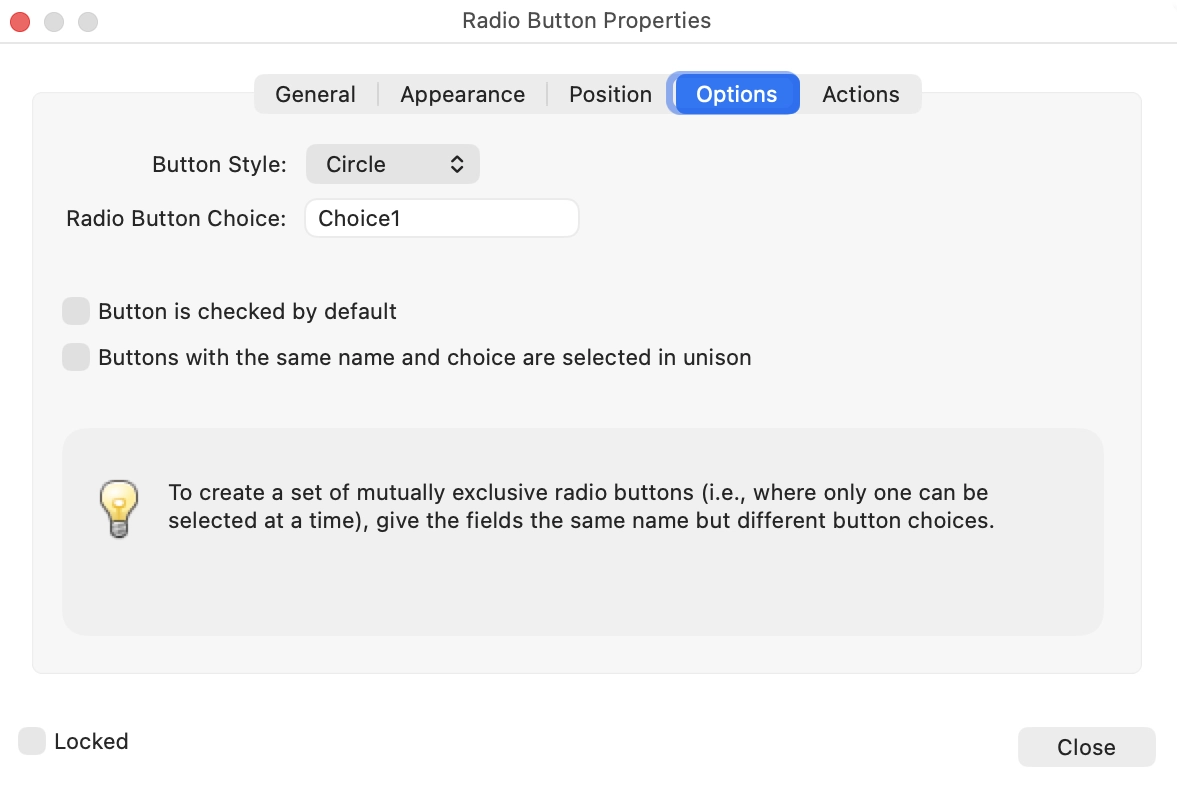
In the Radio Button Properties dialog on the Options tab, you can define the Radio Button Choice. Assistive technology like a screen reader will voice both the Tooltip value and the Radio Button Choice value.
Dropdown lists
To define the items in your dropdown list:
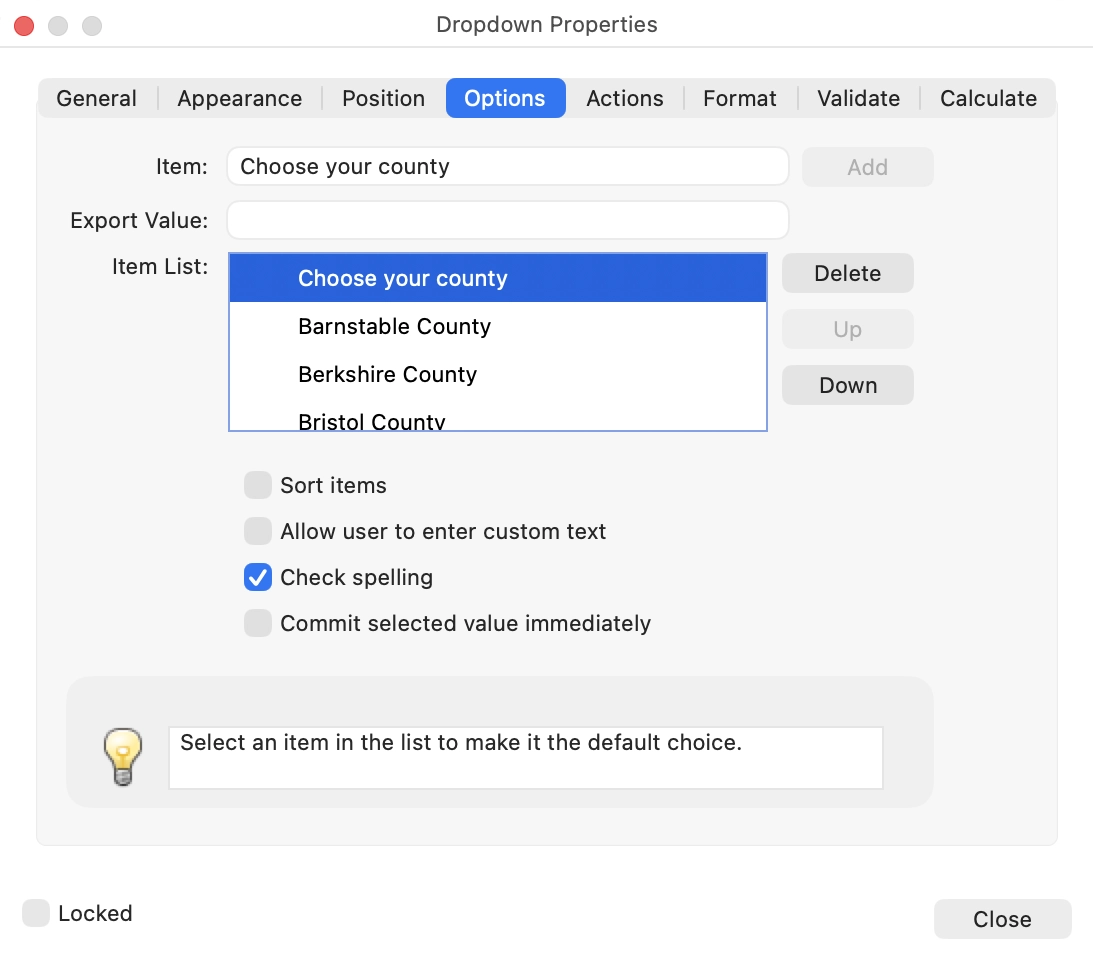
- Place the dropdown field.
- Right-click it and select Properties.
- Select the Options tab
- Type the first Item, such as "Choose an option," then select Add.
- Keep adding items until all are listed in the Items List.
- Select an item from the Item List to make it the default choice, if desired.
Assistive technology like a screen reader will voice the tooltip value, any default selection, and each item as the user navigates with arrow keys or by typing the first letter of the item to jump to it.
Buttons
Buttons can be helpful to reset a form, save it as a flat file, or print it from a local device. Unlike other types of form fields, buttons require both tooltips and visible labels so that all users know what the buttons do.
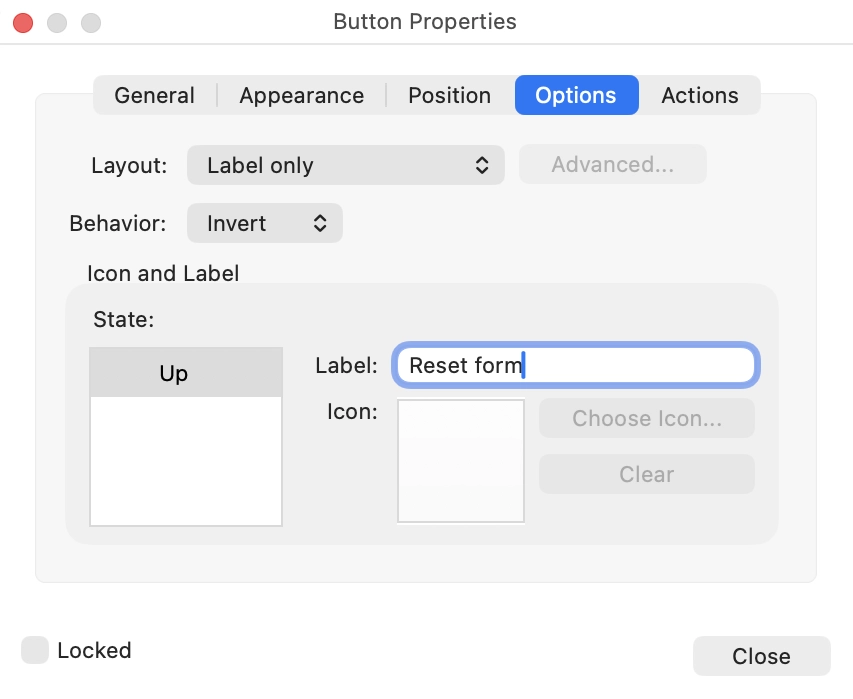
To add a visible label to the button:
- Place your button in the document.
- Right-click it and select Properties.
- Select the Options tab
- Add text to the Label field, such as "Reset form."
The tooltip on a button will override this text for screen reader users, so make sure the tooltip matches the visible label to ensure consistency and accuracy.
To apply a function to a button, use the Actions tab.
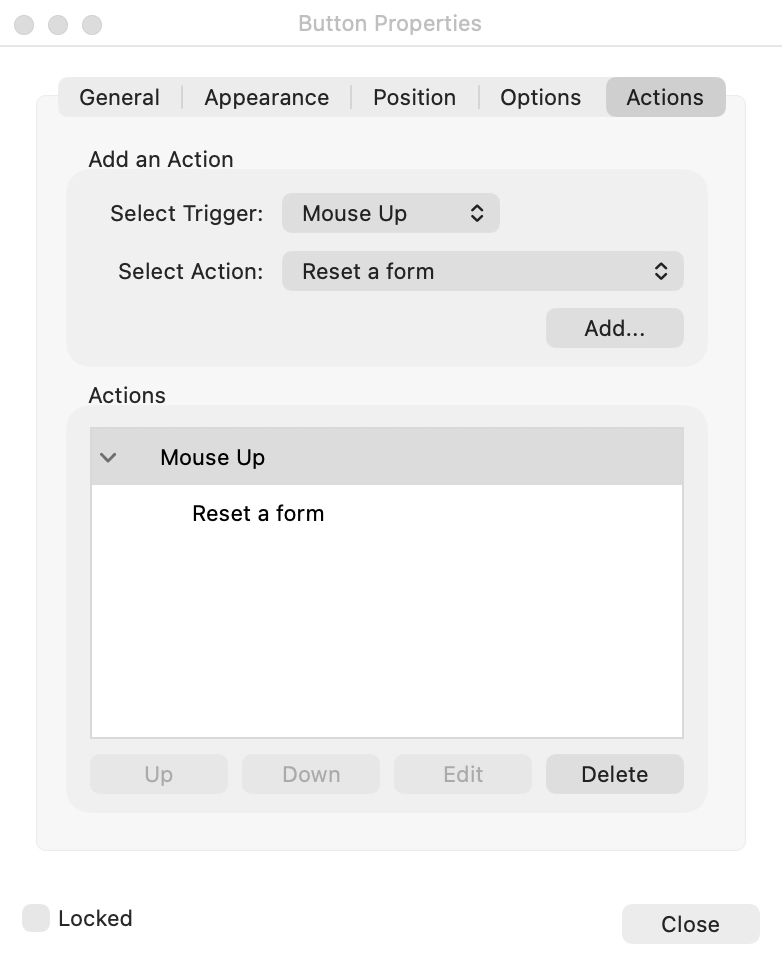
To define what the button will do:
- Select the Actions tab in the Button Properties dialog.
- For most buttons, leave Select Trigger set to Mouse Up to ensure it works with both a mouse click and the Enter key on the keyboard.
- In the Select Action field, choose an option such as Reset a form.
- Select the Add... button to save the action.
Add tooltips to each form field
Tooltips are what gets voiced by screen readers when they encounter a form field so that the user knows what information to enter into the field. Tooltips should contain the text in the visible label and can sometimes contain orienting information (e.g., "line 1 of 3" or "required"). Keep your tooltips concise and specific. Complex or long tooltips may indicate a need to modify the form design.
With the Prepare Form tool open:
- Right click each field on the page or in the right-hand Fields panel.
Note: You can select an option in the Fields panel and press Shift+F10 instead of right-clicking. - Select Properties.
- Select the General tab.
- Enter a Tooltip value that mirrors the visible label.
Note: Acrobat attempts to add the visible label as the Tooltip value. Manually check these autogenerated tooltips or type the text from the visible label as the value.
Writing effective tooltips
Though it may seem like a simple task, form creation is a skill set that requires an understanding of effective form design as well as how to elicit needed information through clear questions or form labels and form field types. In many cases, forms are designed by someone other than the person making the final, accessible PDF form. That person may not have access or authority to change the layout or design of the form, or they may not have access to the source file to arrange the order of form field instructions embedded throughout the form, for example. Screen readers in "forms mode" skip over the text in the form and only read form field tooltips, so it's incredibly important to craft tooltips that are clear, helpful, and concise.
Most advanced screen reader users know how to browse a form without going into forms mode so that they can build a mental model of the instructions, form labels, and form fields before filling it out. However, it's still best practice to write tooltips that contain as much of the instructions as needed to be understood out of context. The challenge is to do this while also keeping the tooltip concise so that the assistive technology user doesn't need to listen to a paragraph of text each time they enter a form field.
Tooltip example 1: Required and multi-line fields
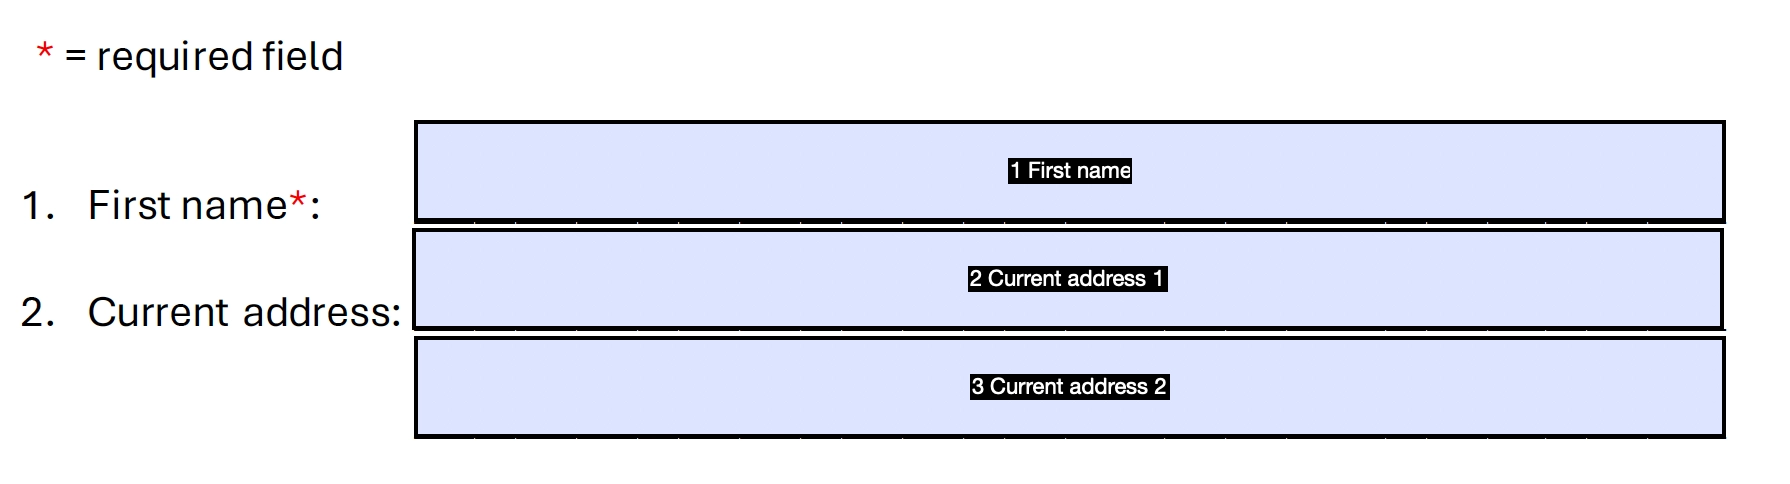
In this first example, the "First name" form field is required and there are two lines for adding "Current address." Though this information may be clear to someone who can see the form, it's information that may not be obvious to those using assistive technology. We need to add this helpful information to the tooltip, as well. The tooltip for "First name" would be, "First name, required." The tooltip for line 1 of "Current address" would be "Current address (street, city, state), line 1 of 2." The tooltip for line 2 of "Current address" would be "Current address (street, city, state), line 2 of 2."
Tooltip example 2: Contextual information
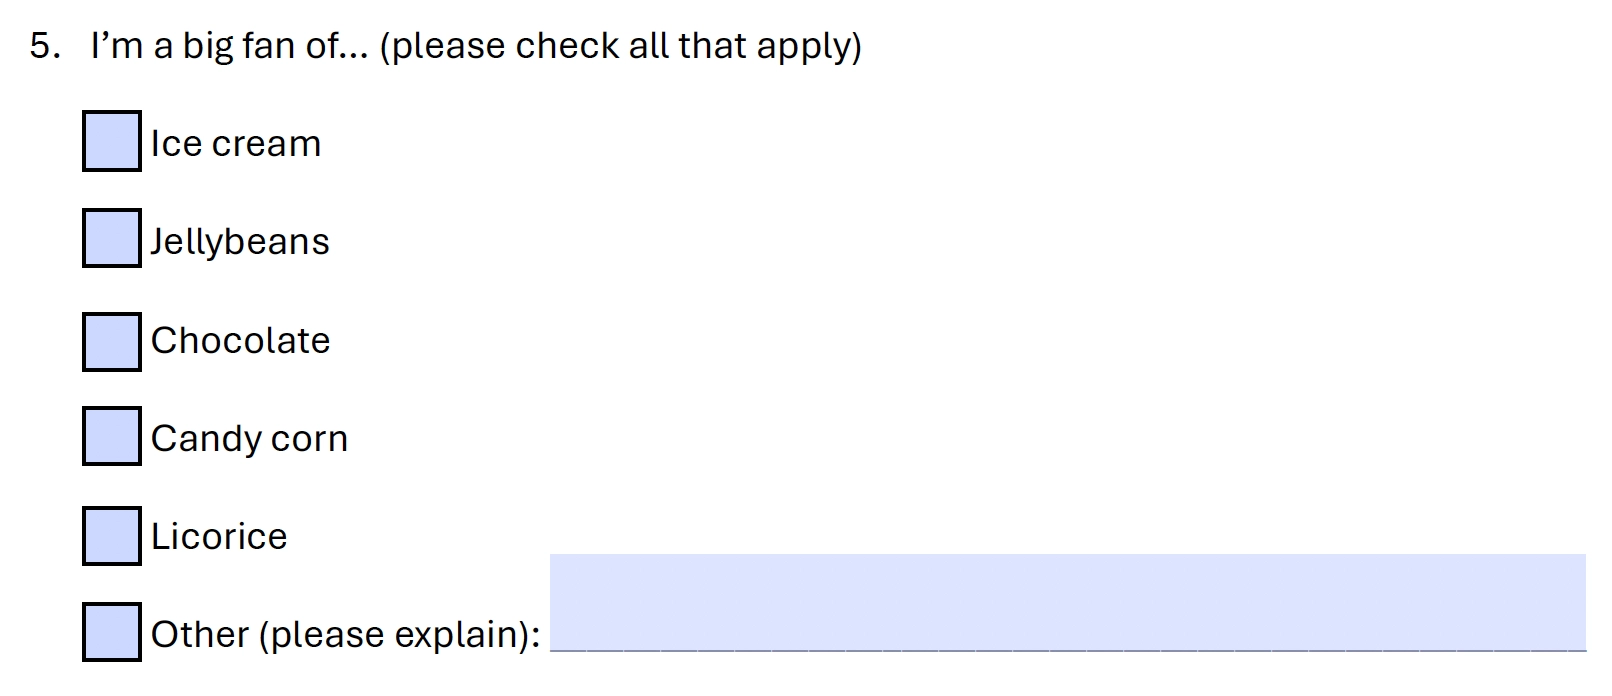
In this second example, if someone checks the "Other (please explain)" checkbox, there's a blank line to add an explanation or list another item. Visually, this connection between the form fields makes sense. We need to add some of this visual contextual information to our tooltip so that the person filling it out knows exactly what to do even if they can't see the visible connection between the fields. The tooltip for the blank line after "Other (please explain)" would be, "If you chose that you love to eat something other than the items listed, please explain."
Tag each form field
Unfortunately, Acrobat does not automatically tag fields that are autodetected or manually created. You must first create <OBJR> (object references) and <Form> tags, then move the tags to their appropriate places in the tag tree.
Your cursor placement in the tag tree prior to performing the steps that follow is critical. Select the <Tags> tag at the very top of the tree. This will ensure that the <Form> tags you create are placed outside the <Document> tag to locate them easily.
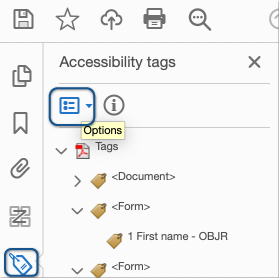
To tag form fields:
- Open the Accessibility Tags pane (also called the tag tree) in the Accessibility tools.
- Place your cursor on the <Tags> tag at the very top of the tree.
- Open the Options menu — the dropdown icon at the top of the pane.
- Select Find from the menu.
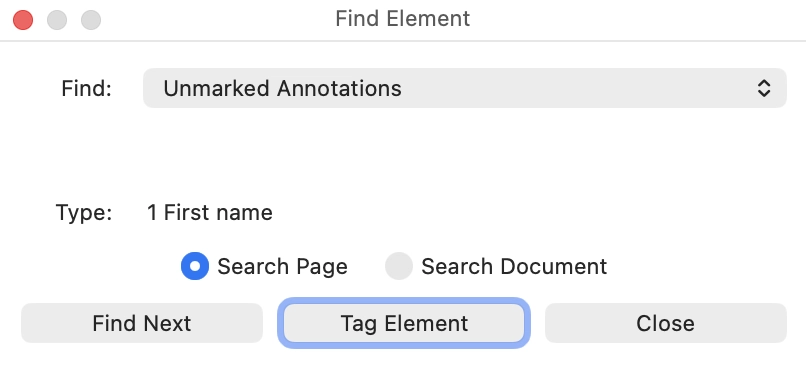
- In the Find Element dialog, select Find: Unmarked Annotations.
- Select Find Next. The first form field should appear with a purple outline to show it is selected.
- Select Tag Element.
- The New Tag dialog will appear. Select Type: Form and select
OK.
Note: This will create a <Form> tag and a nested <OBJR> in the tag tree.
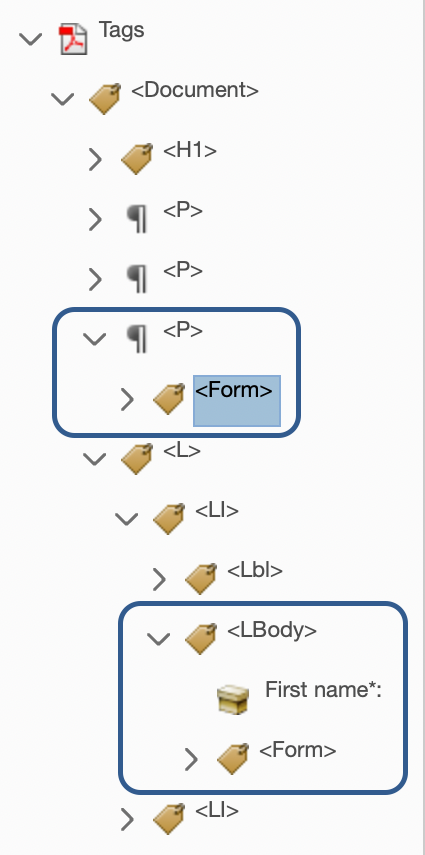
- Locate the <P> or <LBody> tags that contain the content containers associated with the tagged form fields. For example, if the visible text label for the form field is "First name," find the <LBody> tag which contains that content.
Note: If there is no visible text label associated with the form field, you will need to create an empty tag inside which to place the <Form> tag, such as a <P> tag. - Finally, Cut and Paste (which will paste the <Form> tag as a sibling of the item selected) or Paste Child (which will paste the <Form> tag as a child of the selected tag) the <Form> tags into their appropriate places in the tag tree.
Check and repair the tab order
You can check the tab order of your fields manually by clicking anywhere at the top of your form in Preview mode and confirming the order of fields selected by using the tab key on your keyboard to navigate. You can also select Show tab numbers in the Order menu in the Fields panel of the Prepare Form pane. Remember: if you've created a group of radio buttons, using the tab key will only navigate to the first choice in the group. To navigate to other buttons in the group, use the arrow keys.
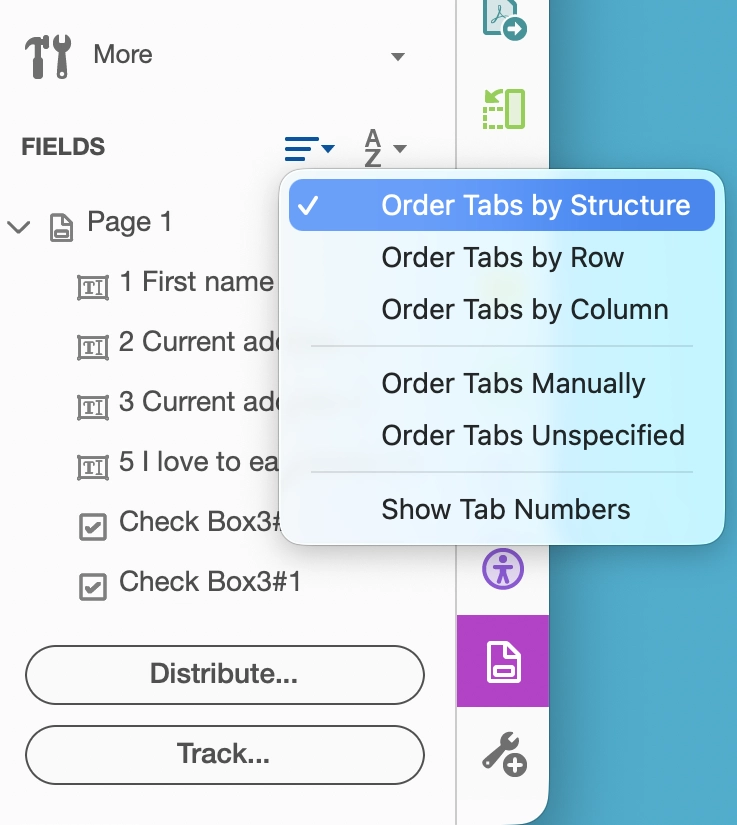
To adjust the tab order of the fields, in the Fields panel of the Prepare Form pane, drag and drop each field or group of fields to the desired position. Remember that you cannot move a field from one page to another in the Fields panel. Alternatively, select the Order menu in the Fields panel and select Order Tabs by Structure. This can be helpful as a starting point if the tab order on the page requires a significant amount of work.
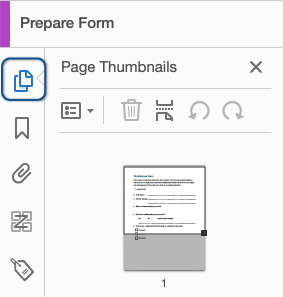
As a final step, select the Page Thumbnails panel and select all of the page thumbnails listed in your document. Right-click (or Shift + F10) on the selected thumbnails and choose Page Properties. In the Page Properties window, Tab Order tab, select Use Document Structure and select OK.
Finalize the form
Use the PDF testing checklist to confirm that no errors were introduced during this process. When you're finished fixing any identified errors, the form is ready to share.